Scratch-Dig Tools
Gage-Line has many years of experience in providing “Scratch-Dig Visual and Dimensional Comparison Tools” to the industry.
Scratch-Dig tools take many forms. For example they can be:
-Standard & Custom Made
-Chrome image on glass
-Black photo image on film
-White photo image on film
-White image, glass laminate
-Amber (transparent) image on film
-Amber (transparent), glass laminate
-Amber image on glass
-Reticles used in microscopes
-Reticles used in pocket comparators
Standard Scratch-Dig Tools
The comparison standard is made per Optical Surfaces Imperfections Standard ANSI/OEOSC OP1.002.
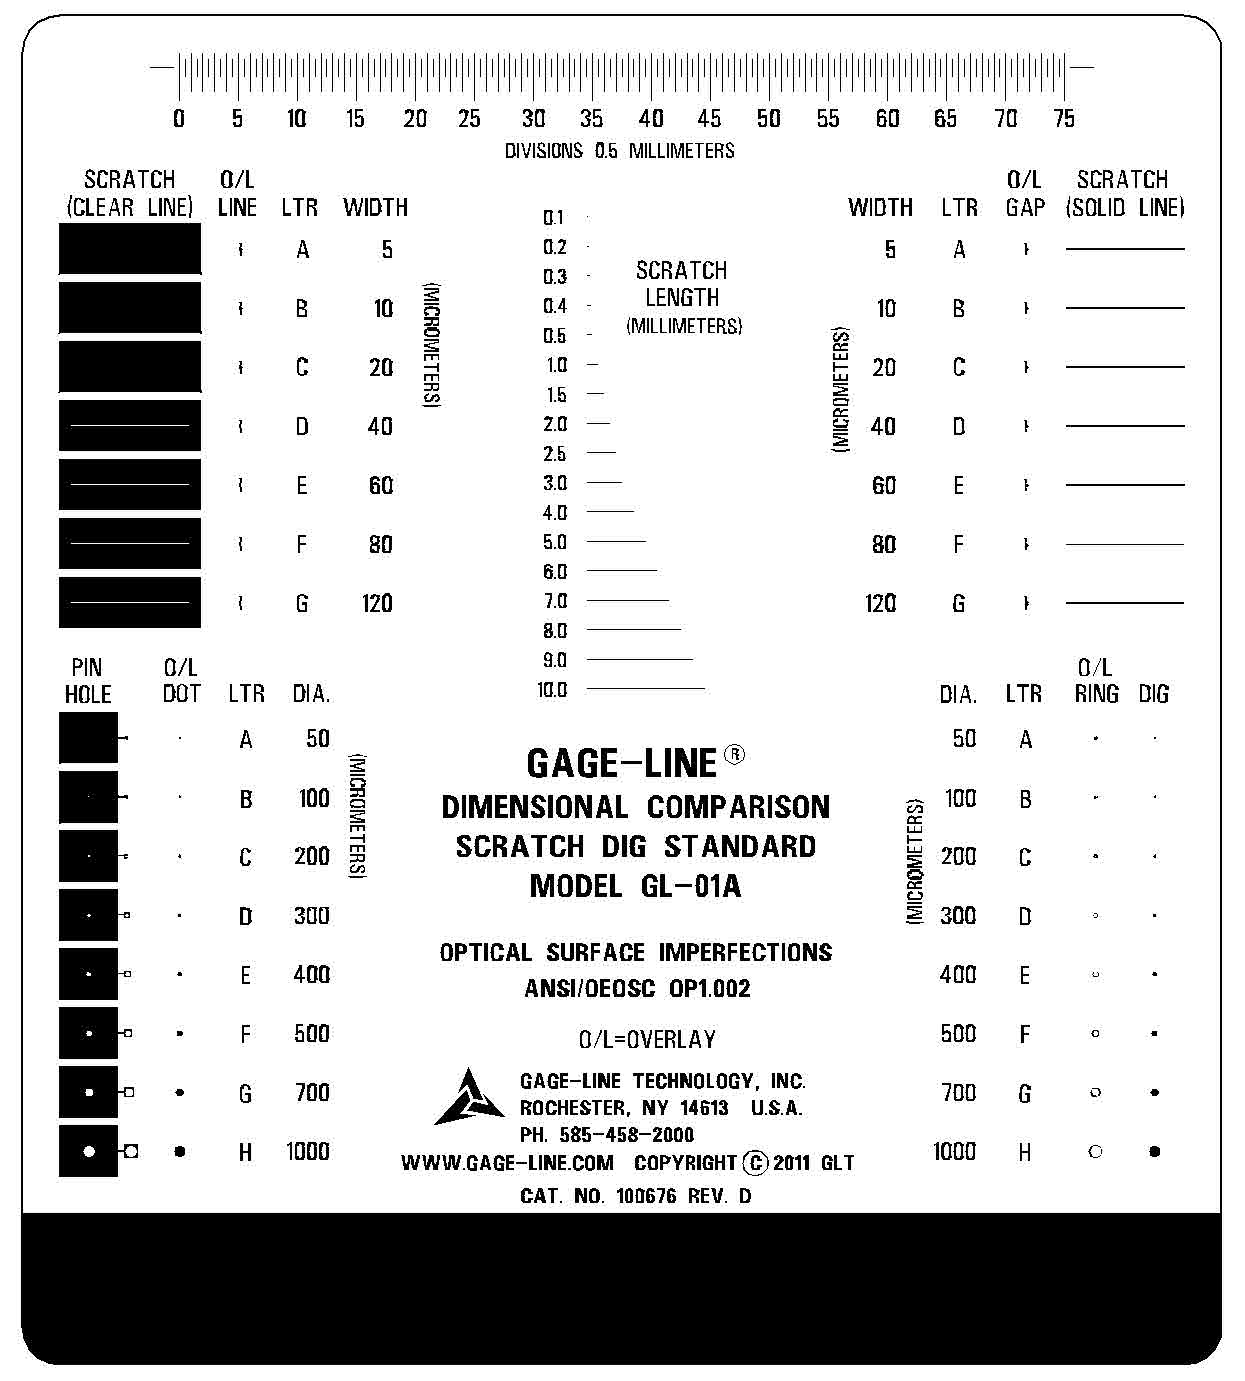
It displays the Scratch-Dig designations by a letter with the scratch width dimensions and the dig diameter shown in micrometers.
The standard is provided as shown below. We also offer the standard with an optional handle and knobs or complete frame with knobs. A tri-position stand is also available for holding the standards with the handle or frame.
O/L = Overlay. Overlaying is inspecting by placing the standard directly over the inspection piece or leaving a small gap in between to avoid damage.
The “SCRATCH (CLEAR LINE)” is a space the same width as the “SCRATCH (SOLID LINE)”. This is used when working with reflective surfaces.
The “O/L LINE” has the clear scratch dimension pinpointed by a short line. Scratches often are not straight lines of a consistent width. They are hard to compare to a straight line standard. The “O/L LINE” allows the comparison of the line specifically at the widest point. The short “O/L LINE” must fall within the clear line scratch.
The “O/L GAP” has the solid scratch dimension pin pointed between two short lines. Since many scratches take many twists and aren’t constant width straight lines, they are hard to compare to a straight line standard. The “O/L GAP” allows the comparison of the line specifically at the widest width. The solid scratch must fall between the inner edges of the short lines.
The “SCRATCH (SOLID LINE)” is used for comparison check.
The “PIN HOLE” is a clear dig diameter with a solid background. There are two of the same size pinholes. One with a small solid background and one with a large solid background. The small solid background makes finding a dig easier. The “PIN HOLE” is used when inspecting pinholes in reflective surfaces.
The “O/L DOT” is a solid dot the size of a standard dig used for inspecting pinholes in reflective surfaces by overlaying. It can also be used to gage the size of pinholes by overlaying. If the “O/L DOT” falls inside a clear pinhole, the pinhole is larger than the “O/L DOT”, if it completely covers the pinhole, the pinhole is smaller than the “O/L DOT”.
The “O/L RING” has the same dimension on the inner edge of the diameter as the standard dig. The “O/L RING” is used to gage the size of digs by overlaying. If the dig falls inside the “O/L RING” it is smaller than the “O/L RING” diameter, if it completely covers the inside “O/L RING” diameter it is larger than the “O/L RING” diameter.
The “DIG” is a solid dot used for comparison check.
The “SCRATCH LENGTH” section shows various scratch lengths for ease of length inspection. The line width of all lines is 0.06mm.
The scale is 75 mm long and has 0.5mm divisions.
The size of the substrate is 4″ x 4.75″.
Cat. No. 100676 Gage-Line® Dimensional Comparison Standard (Click for Details)
Cat. No. 100757 Gage-Line® Dimensional Comparison Standard with handle (Click for Details)
Cat. No. 100758 Gage-Line® Dimensional Comparison Standard with frame (Click for Details)
Cat. No. 100779 Tri-position holding fixture for 100757 and 100758 (Click for Details)
Note: This is a new web page under construction.
Gage-Line has many more standard catalog items to be listed.
Please call if you have a specific need.
ANSI/OEOSC OP1.002-2009 may be purchased through ANSI.

